Install R
This page has 30 images
Introduction
The first time installing R can seem intimidating. To start, be clear about the overall goal of the procedure: providing the student with an accessible environment for solving statistics problems.
In brief, this page explains how to get R set up on your computer. First, you need to download the R installer from the official CRAN website. When you run the installer,in general, accept the default choices. However, for Windows users, it’s important to right-click the file and choose “Run as administrator.” This step ensures that R has the proper permissions to install correctly and avoids problems with user access later on. Once installed, you can open R and test it by typing a simple command like `2 + 2` in the console to confirm everything is working.
The flow chart presented in Fig 1 suggests a way to orient the student to solving the task. First, understand which type of computing environment you have available. Second, if a macOS, then additional software (XQuartz) is required to provide full function to the R software. Third, download and install the base R software appropriate for the computer system.
Figure 1 suggests an R installation flow chart.
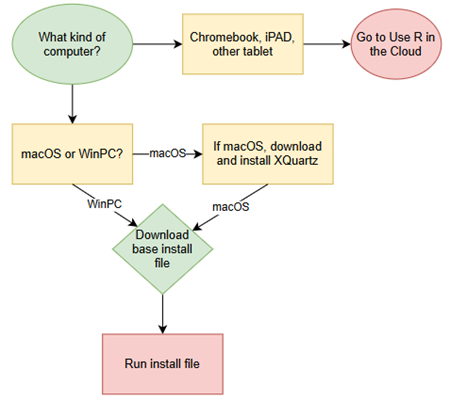
Figure 1. Suggested flow chart for R installation.
Note 1: I skipped Linux in the flow chart — I’m working on the assumption that Linux users are more comfortable installing 3rd party software. However, some notes on R installs on Linux distros are included on this page.
It’s possible to follow the steps in Figure 1, accepting all default options presented along the way, to end up with a working R environment. As with many software processes, there are choices beyond defaults that can be made to improve the software use.
This page presents a detailed guide about how to install R onto your computer — this is referred to as building a local development environment or LDE. Additional install R help was provided in Chapter 1.1 – A quick look at R and R Commander.
Instructions for RStudio are also provided (optional for BI311 students). A guide to install R Commander is provided in Install R Commander.
Instructions for how to run R via a “cloud computing” (serverless) option — a remote development environment — are also provided, Use R in the Cloud.
For help upgrading installed packages after upgrading new R version, see R packages.
Note 2: Installation guides quickly become outdated. This page was created first in September 2019 and last updated August 2025 and describes working installation protocols at that time. As of August 2025, R -4.5.1 was current version. Instructions for Win10 and Win11 are the same. Instructions for Intel-based macOS are the same; with Apple’s switch to ARM64 (M1, M2, M3, M4), changes have been made. Going forward, the instructions on this page, but not my videos — version numbers need to be updated in the videos, are likely to be the same for new R versions. And wow! Search Google or Bing for “how to install R,” options in the millions. Ultimately the best source is in the R installation and administration manual.
Per usual caveat about this page of instructions: my advice is offered for instructional purposes and in no way implies warranty against damage or guarantee of success.
Run R on your computer (LDE install)
CoLab, skip this step: Instead, go to Use R in the cloud.
So why in this day in age should you install and build R on your own computer? The remote options to run R in the cloud are a wonderful option, convenient: you can access anywhere you have internet, from any device that connects to the internet. It’s easy to share and work together on projects, particularly those based on Jupyter Notebooks.
I think the main benefits to a local installation is it’s a more efficient environment to work in — you have control of everything and, provided your PC has power, a working R install on your computer will always be available to you. Since you can control the update cycle for your computer, you won’t run into times you cannot access the remote server to work on your project. Testing code is faster on a local install, feedback — think error messages — apply to your installed version. And, while remote R servers may come with low initial costs to students, any significant use will quickly require paid accounts. As a reminder, the good folks at the R-project continue to offer R as free software. All you need to do is work through the install process.
Start at the R-project homepage, r-project.org. To download software, first click on CRAN link, located on left hand side of the screen (here, highlighted by green arrow, Fig 2).
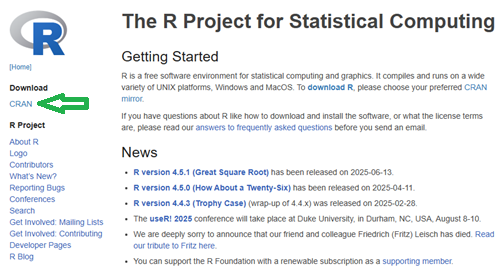
Figure 2. Screenshot homepage for R-project.org.
Figure 3 shows a screenshot of the CRAN mirror page. The idea is to select the mirror site closest to your location. In Hawaiʻi, that’s likely to be any of the sites in California. However, I recommend selecting the first in the list, 0-cloud, at cloud.r-project.org (highlighted by green arrow, Fig 3).
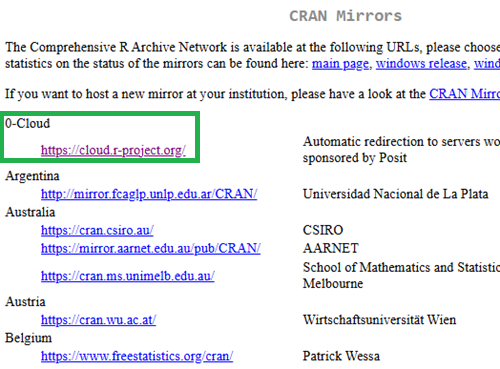
Figure 3. Screenshot of portion of R-Project CRAN mirror page.
Note 3: After installing R, see this page to learn how to set the CRAN mirror.
After selecting the mirror site, the download page is presented (Fig 4). Click on the link that corresponds to your computer system (Linux, macOS, or Windows).
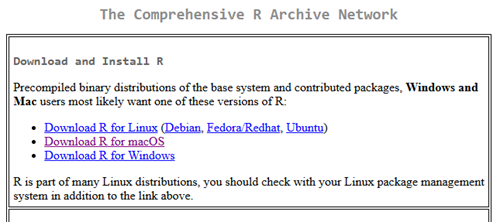
Figure 4. Screenshot of portion of base R download page.
Once the installation file is located onto your computer, proceed to install base R.
Detailed instructions
For screenshots of installation steps on WinPC, see Win10/11 setup, screenshots
- Windows PCs, download the base application from selected CRAN Mirror site, select Download R for Windows, and install the R software as you would any other software. All of you are likely to have the 64-bit version of Windows 11, so install the 64-bit version of R. Follow the instructions as they are presented. Screenshots of the install process are available at the end of this page (click here or scroll down to Win11 setup, Screenshots).
- Current versions of Microsoft Windows come in several flavors, the simplest distinction is between home and pro. R runs perfectly well on both.
- Windows 10 is reaching end of life cycle.
- Some inexpensive Microsoft Windows PCs are built on ARM64, not Intel or AMD64 CPU. Thus, installing R and or RStudio may prove problematic.
- Also note: Windows in S mode only run applications from the Microsoft store. To install R, you first may need to switch out of S mode (see Microsoft FAQ about S mode).
- You should install R with Administrator privileges. Highlight the install file, right-click the file, and select “Run as administrator” from the popup menu.
- When you first try to run R you may get a popup screen “Windows protected your PC,” locate and click on the “More info” link and select “Run anyway.”
- This in no way will harm your computer — provided you have downloaded from official sites. R is a verified program. Microsoft has taken an aggressive line on developers and favors apps that are part of their app store.
- It is advisable to confirm for yourself: check the md5sum against the fingerprint on the CRAN server
- When prompted, I recommend that you change the install directory to root folder, e.g.,
C:\R\R-4.5.1. This will allow for installation of packages to the common library as opposed to a personal library.- I recommend this change because of how Windows assigns home folders. During initial setup Windows 10 prompted you to choose a username and whether you wanted your work stored locally or in your OneDrive folder. A worse case scenario? You select a username with spaces, e.g.,”Mike Dohm,” and you selected OneDrive. Both will cause challenges later for running and or installing packages for R.
- If you install R anywhere but the default Program files folder on your Win10/11 PC, chances are you will need to add the folder containing the executable, r.exe, to you path.
- Search: “env”
- Open “Edit the system environment variables” in the Control Panel
- Click Advanced tab, then click on Environment Variables… button (lower right of panel)
- Under System variables, scroll to and select Path.
- Click Edit… button, then click New button.
- Type in the path to the folder containing R.exe. That’s likely to be C:\R\R-4.5.1, assuming R-4.5.1 is the latest version of R installed on your computer.
- If you install R anywhere but the default Program files folder on your Win10/11 PC, chances are you will need to add the folder containing the executable, r.exe, to you path.
- I made a video for you. Video is about 26 minutes long; at 22 minute mark, video includes how to install R Commander (instructions provided Install R Commander).
- Apologies for the production quality — videos are not my thing.
- I recommend this change because of how Windows assigns home folders. During initial setup Windows 10 prompted you to choose a username and whether you wanted your work stored locally or in your OneDrive folder. A worse case scenario? You select a username with spaces, e.g.,”Mike Dohm,” and you selected OneDrive. Both will cause challenges later for running and or installing packages for R.
- Current versions of Microsoft Windows come in several flavors, the simplest distinction is between home and pro. R runs perfectly well on both.
For screenshots of installation steps on WinPC, see MacOS setup, screenshots
- macOS PCs, first you must download and install XQuartz from https://www.xquartz.org. Best to restart your mac after installing XQuartz then proceed to install R.
After installing XQuartz, then return to https://cran.r-project.org, select Download for Mac(OS) X, and run the installer. Screenshots of the install process are available at the end of this page (click here or scroll down to Macos setup, Screenshots).- As of August 2025, be advised that there are two distinct R versions for your MacBook or iMac.
- For MacBook or iMac with Apple’s M1 or M2 ARM chip sets, download and install
R-4.5.1-arm64.pkg.- If you recently purchased a new MacBook or iMac (2020 to present), then you probably have the M2 or M3 chipset (check by clicking the Apple icon, then selecting About this Mac or System Information (
/Applications/Utilities/System Information.app)). - XQuartz version 2.8.5 works on macs with either the M1 or Intel chipsets.
- If you recently purchased a new MacBook or iMac (2020 to present), then you probably have the M2 or M3 chipset (check by clicking the Apple icon, then selecting About this Mac or System Information (
- For older MacBook or iMacs with Intel processors, download
R-4.5.1-x86_64.pkg. Depreciated 8/4/2021: Be advised that these instructions are for Intel-based macs. At the time of writing these instructions (April 2021), the installation of XQuartz and R should work on new M1-based macs. At the time of this writing (April 2021), however, R will not run natively on your M1 mac. It will run using Rosetta 2, an emulator that is included with your M1 mac. The R folks are busy working on a version that will run natively, which may be ready within a few months.
- For MacBook or iMac with Apple’s M1 or M2 ARM chip sets, download and install
- At the completion of the install process, don’t forget to drag the R app to your Applications folder.
- When you first try to run R, you may get a popup screen which provides no option to start the app, and perhaps even a rather ominous option to move the app to Trash. Just close the warning message and right-click on the R app. A new screen pops up, which looks very much like the previous warning, but now you will see and option to open the app. Click on open to start R.
- Like the message to Windows PC users, bypassing Apple’s Gatekeeper to run R in no way will harm your computer — provided you have downloaded from official sites — R is a verified program. Apple has taken an aggressive line on developers and favors apps that are part of their app store.
- As of August 2025, be advised that there are two distinct R versions for your MacBook or iMac.
- LINUX distros. If your PC platform is Linux, then you should be comfortable with installation and updating of software. R base is already included in Debian distributions (e.g., Mint, Ubuntu). See https://cloud.r-project.org/ for additional instructions.
- For Chromebook users, if you can install a Linux subsystem, then you can also install and run R. For instructions to install R see Levi’s excellent writeup at levente.littvay.hu/chromebook/.
Note 4: To install up-to-date R and RStudio, your Chromebook needs to have Intel or AMD CPU; my ASUS Chromebook has an ARM64 processor (MediaTek mt8183), and Levi’s instructions don’t apply. As of January 2024 I am pushing the installation process a bit on my little Chromebook and have successfully created the Linux container (Debian 11, Bullseye) and installed base (and development) R version (4.0.4) included with the Linux distribution. Stay tuned — I’ll update progress with installing an R environment on ARM64-based Chromebook.
Update August 2025 — no change, very challenging to get R environment running and updated on ARM64 Chromebook. RStudio not possible.
Test R
For both macOS and Windows PCs, successful installation of R on your computer installs base R programming language and a simple graphical user interface. Test your install by running code in the terminal (one line at a time) or via script:
- Rgui.exe (Windows PC)
- File → New script
Enter code in script editor, e.g.,
myX <- c(1,2,3,4)
myY <- c(5,10,15,20)
plot(myY,myX)
- Run code: Ctrl+R
Figure 5 shows screenshot of R running on WinPC. RGui.exe (1), script editor (2), and results of plot() (3) on WinPC.
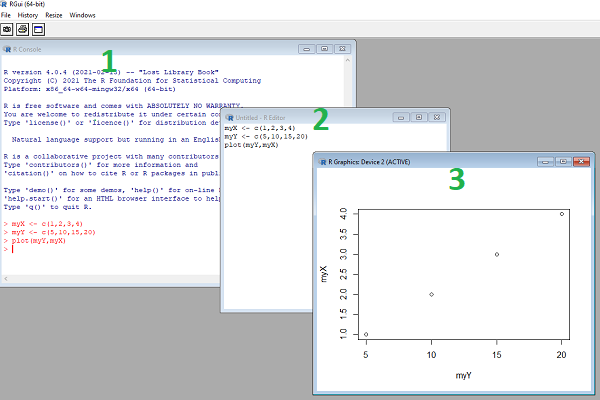
Figure 5. Screenshot of RGui.exe (1), script editor (2), and results of plot() (3) on WinPC.
- R.app (macOS): run code in the terminal or via script
- File → New Document
Enter code in script editor, e.g.,
myX <- c(1,2,3,4)
myY <- c(5,10,15,20)
plot(myY,myX)
- Run code: Cmd+Enter
Figure 6 shows screenshot of R running on macOS. R.app (1), script editor (2), and results of plot() (3).
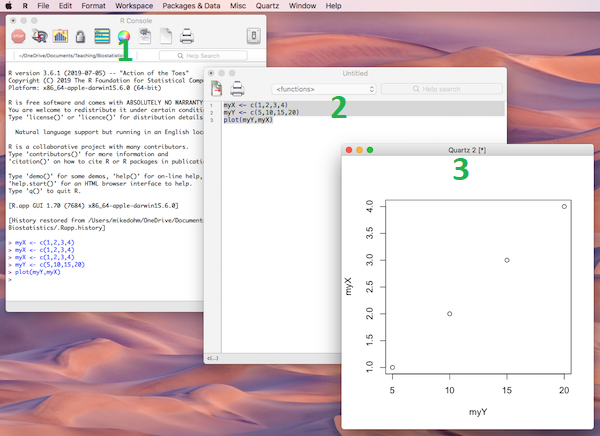
Figure 6. Screenshot of R.app (1), script editor (2), and results of plot() (3) on macOS.
Many of you would like a video. Do a little search and you’ll find plenty, although most are also showing how to install RStudio in addition to base R.
Note 5: For my Biostatistics class, BI311, we typically will run R and use R Commander for scripting, without RStudio.
For BI311, we also use R Commander package
R Commander is a package that adds function to R; it provides a familiar point-and-click interface to R, which allows the user to access functions via a drop-down menu system (Fox 2017).
Go to Install R Commander guide.
Personalize R startup
To add function to R, you’ll download many R packages. These, too, are stored at the mirror sites. Each time you run install.packages(), R will ask for the mirror site. The R app on Windows pops up a long selection box; macOS R.app is a bit more friendly, but regardless, it’s best to choose a mirror site at the beginning of a session. At the R prompt, type and submit the command
options(repos = c(CRAN = "https://cloud.r-project.org"))
this will remain in effect for the current R session.
To make the change permanent, add to .Rprofile — a hidden file — in your personal home directory
local({
r <- getOption("repos")
r["CRAN"] <- "https://cloud.r-project.org"
options(repos = r)
})
If you use textedit or notepad, make sure to return after the }); the file requires an empty new line to run.
Restart R, then enter at the prompt
file.exists("~/.Rprofile")
If you’ve created the Rprofile file correctly, R should repeat.
Run R from the terminal
Whether yours is a mac or win11 pc, you have a powerful computing environment lurking beneath the glossy graphic user interface. It’s called the terminal. The terminal is a place where text-based instructions may be written and submitted to command your computer to do something.
On win11 pc, the modern terminal is the Power Shell. Search “PowerShell,” then open Windows PowerShell. Alternatively, shortcut + X, then I key. This opens terminal in your home folder.
- You’ll want to navigate to your working folder, e.g., BI311 on the Desktop. Setting your working folder can be done in R of course, but at the terminal type the command “
cd \users\default\desktop\bi311“.
On macOS, Spotlight (search) “Terminal.app“. Alternatively, right-click on your working folder icon and select New terminal at Folder from the popup menu.
On Ubuntu Linux, shortcut keys + alt, then t key.
Open the included script editor
Use RStudio
Rstudio is a very popular data science IDE, specifically written for R programming. Therefore, if your goal is to become adept at R programming, go with RStudio. Like R Commander, Rstudio provides an environment to write an manage code, generate markdown reports, and importantly, manage files in R projects. Figure 7 shows a screenshot of RStudio: Clockwise, four panes: Source, Environment, Output, Console on WinPC. BI311 students, please note that I recommend use of R Commander and Google CoLab.
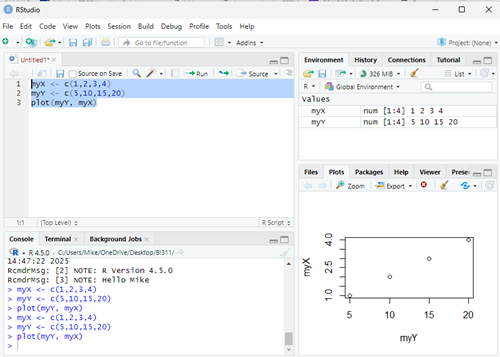
Figure 7. Screenshot of RStudio IDE.
Installation of RStudio desktop is straightforward.
Go to https://posit.co/download/rstudio-desktop/
Install R first. Since at this point you’ve likely already installed R, go directly to 2 (green box, Fig 8).
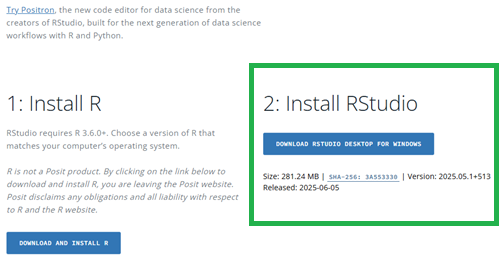
Figure 8. Screenshot RStudio desktop download page, current as of September 2025.
After downloading the installation software, double click the file to begin. Follow on screen instructions for your computer system.
Run R in the “Cloud”
If you do not wish to install R, or, if you have a Chromebook and, therefore cannot gracefully install R, then there are alternatives; Run R in the Cloud. I’ll list three ways to run R in the cloud for free. Go to Use R in the Cloud guide.
MacOS setup, Screenshots
Download R install package from R-project.org, then select the R install package from your Download folder (Fig 9).
Note 6: The following screenshots were for previous R version 4.1.1. As of Fall 2025, current R version is 4.5.1. The screenshots are consistent between the current and older versions of R on macOS.
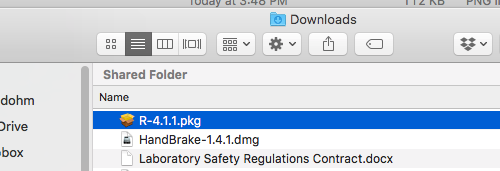
Figure 9. Screenshot — Find the R install file in your download folder.
First screen, R install for macOS (Fig 10). Select continue.
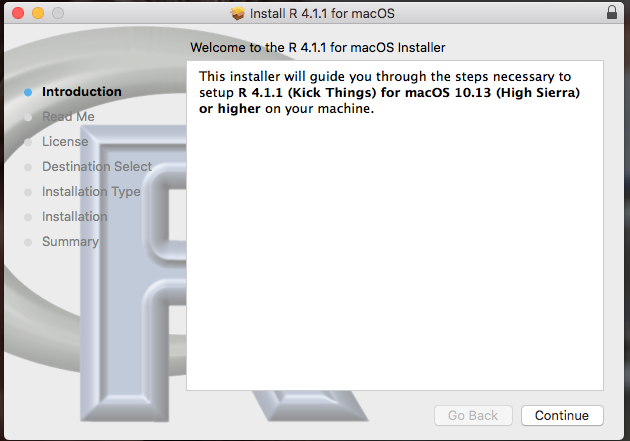
Figure 10. Screenshot: first instructions pop-up window.
Second screen, R install on macOS (Fig 11). Select continue.
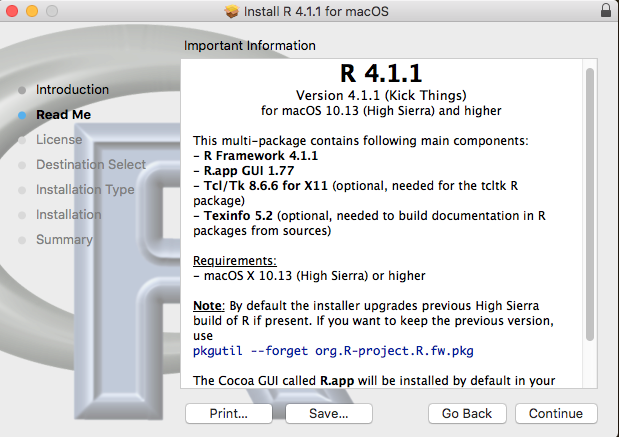
Figure 11. Screenshot: second instructions pop-up window.
Third screen, R install on macOS (Fig 12). Select continue.

Figure 12. Screenshot: third instructions pop-up window.
Fourth screen, R install on macOS (Fig 13). Agree to continue.
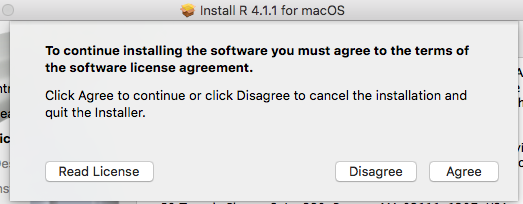
Figure 13. Screenshot: fourth instructions pop-up window.
Fifth screen, R install on macOS (Fig 14). Select Install.
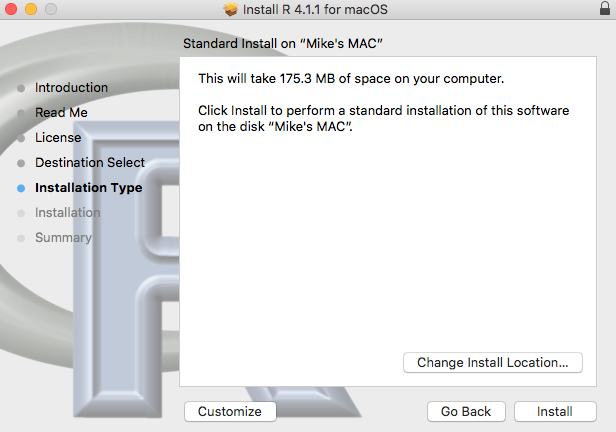
Figure 14. Screenshot: fifth instructions pop-up window.
Sixth screen, R install on macOS (Fig 15). Enter your username and password for your computer, then select Install Software.
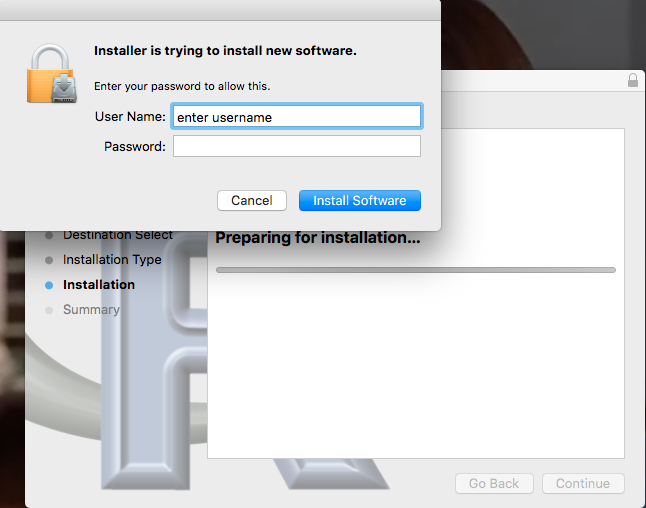
Figure 15. Screenshot: sixth instructions pop-up window.
Seventh screen, R install on macOS (Fig 16). Several screens will popup, reporting progress. Be patient!

Figure 16. Screenshot: seventh instructions pop-up window.
Eighth and final screen, R install on macOS (Fig 17). Select close.
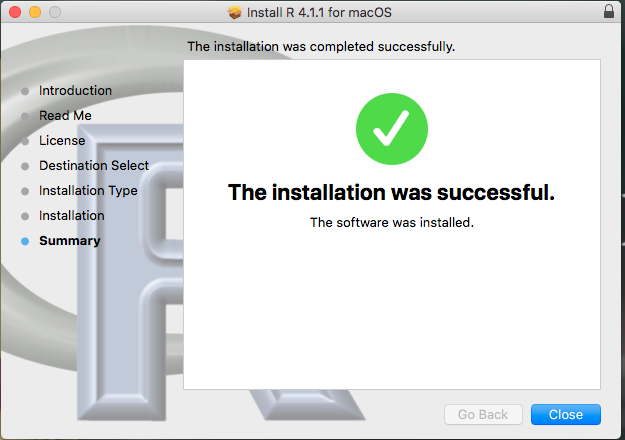
Figure 17. Screenshot: eighth and final instructions pop-up window.
Optional — Keep or discard the install file (Fig 18). I keep and then do manual delete after I’ve confirmed the installation.
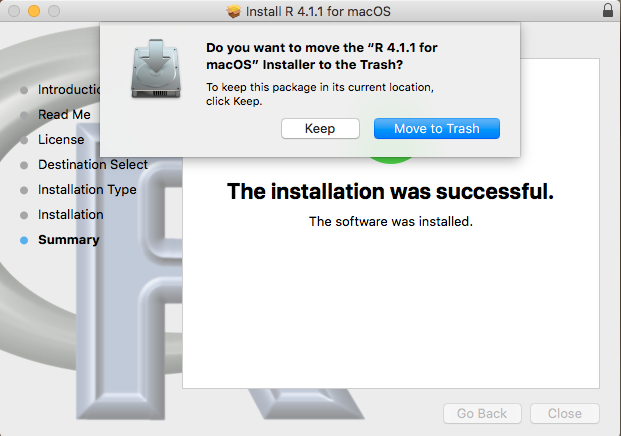
Figure 18. Screenshot: MacOS will prompt with option to delete the installation file. This has no effect on the installation of R.
From Applications folder, start R.app. You should see the R Console (Fig 19).
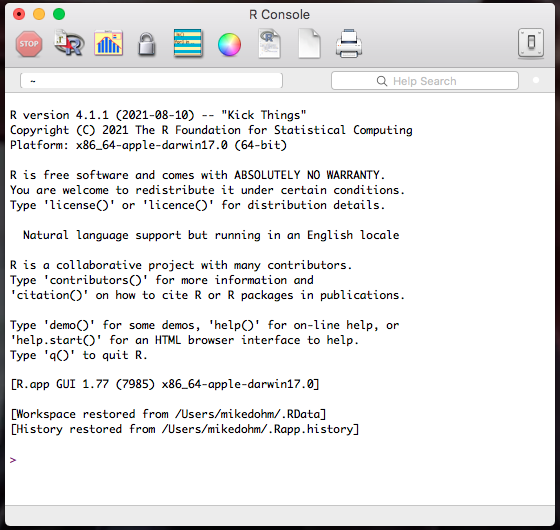
Figure 19. Screenshot: R Console in the R.app on macOS.
Wind10/11 setup, screenshots
Download from R-project.org, then right-click the R install package from your Download folder. Run as administrator (Fig 20).
Note 7: The following screenshots were for previous versions of R, 3.6.1 and 4.0.5. As of Fall 2025, current R version is 4.5.1. The screenshots are consistent between the current and older versions of R on Windows 10/11.
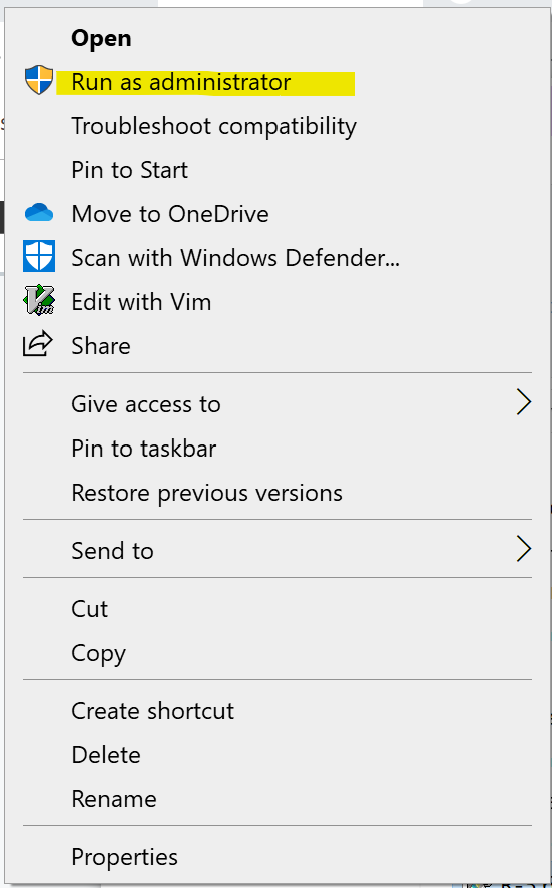
Figure 20. WinPC screenshot: Pop-up menu after right-click on the R installation file in windows Explorer.
First screen, select language (Fig 21). Select OK to continue
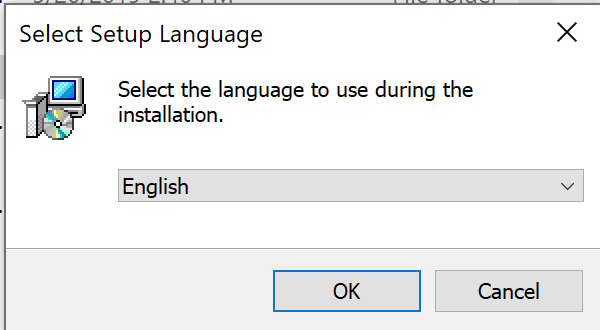
Figure 21. WinPC screenshot: first instructions pop-up window.
Second screen (Fig 22), click Next to continue

Figure 22. WinPC screenshot: second instructions pop-up window.
Third screen (Fig 23). Change the default location (show in the screenshot) to root folder, e.g., C:\R\R-4.5.1 (current version as of August 2025).
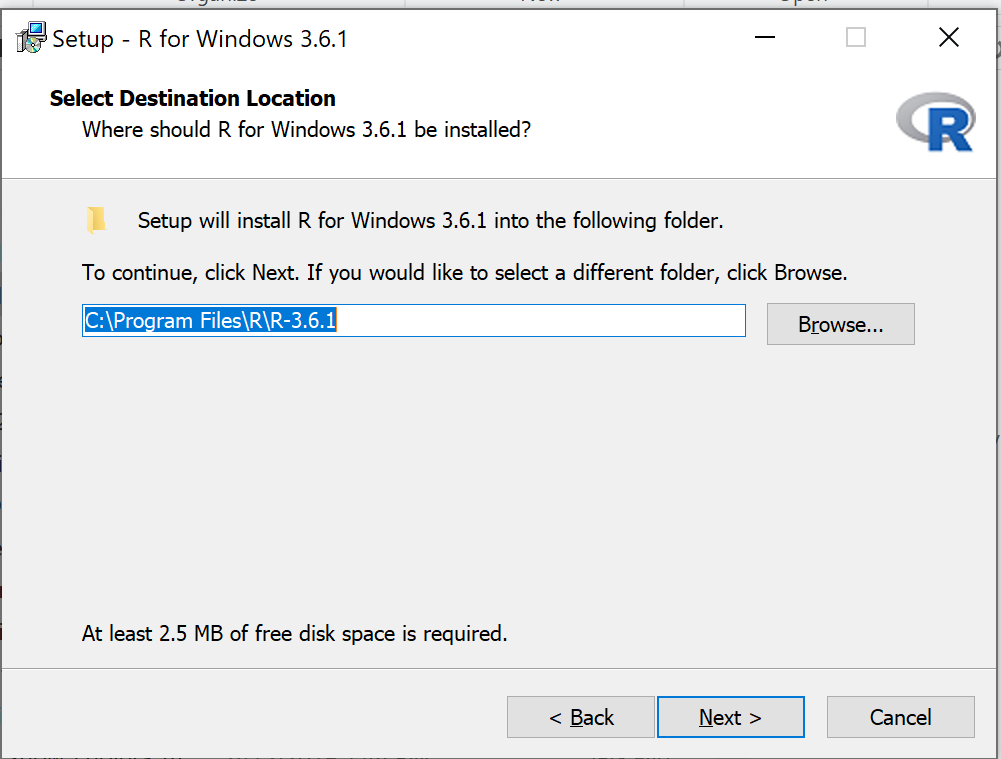
Figure 23. WinPC screenshot: third instructions pop-up window. Note — R-4.5.1 (current version as of August 2025).
Fourth screen (Fig 24). Change startup options. Select Yes (customized startup) to continue.
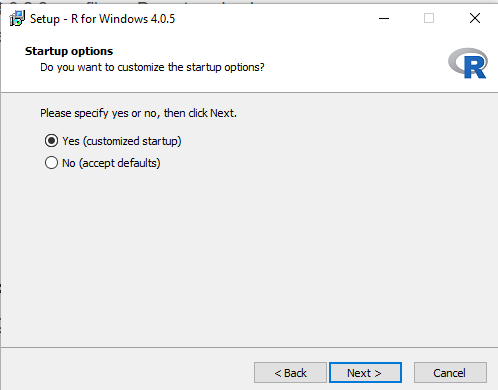
Figure 24. WinPC screenshot: fourth instructions pop-up window.
Fifth screen (Fig 25), select SDI — single document interface — not the default MDI — multiple document interface, then Next to continue.
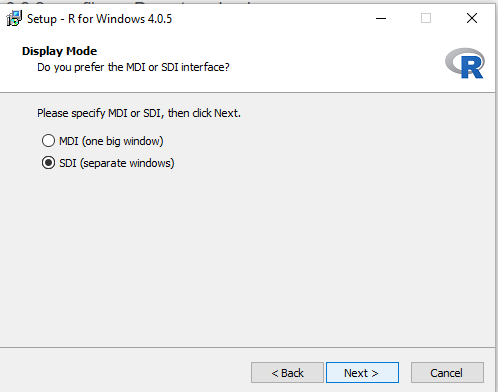
Figure 25. WinPC screenshot: fifth instructions pop-up window. Recommend setting to SDI.
Sixth screen (Fig 26), select HTML help, then Next to continue.
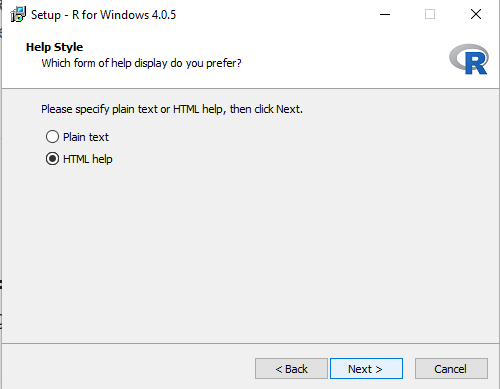
Figure 26. WinPC screenshot: sixth instructions pop-up window.
Seventh screen (Fig 27), leave start menu folder as is (R), then Next to continue.
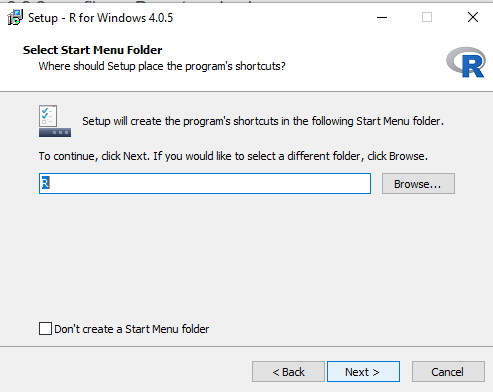
Figure 27. WinPC screenshot: seventh instructions pop-up window.
Eighth screen (Fig 28), check all boxes, then Next to continue.
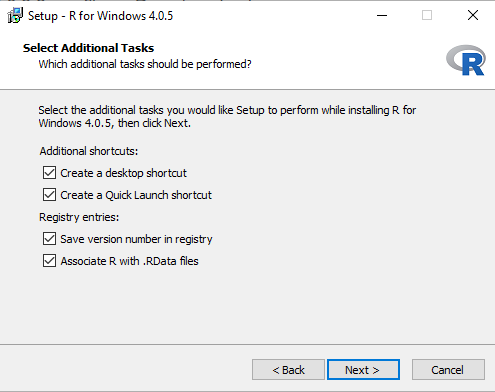
Figure 28. WinPC screenshot: eighth instructions pop-up window.
Ninth screen (Fig 29), a series of status updates during the installation.
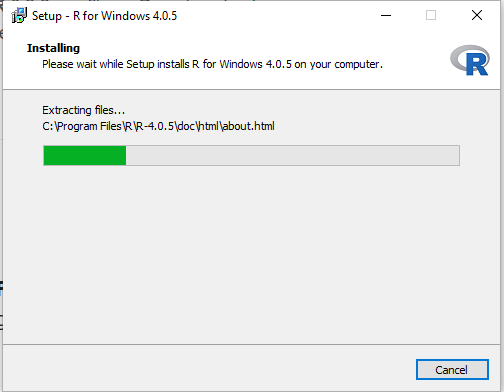
Figure 29. WinPC screenshot: ninth instructions pop-up window.
Final screen (Fig 30), successful install.
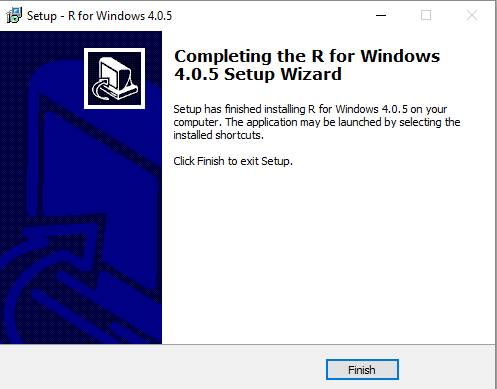
Figure 30. WinPC screenshot: final instructions pop-up window — successful installation.
/MD